Mastering the art of taking a full-page screenshot on an iPhone is a simple yet valuable skill that can greatly enhance your productivity and digital organization. This guide aims to walk you through the process step-by-step, while also providing some tips and tricks to get the most out of this feature.
Introduction to Full-Page Screenshot on iPhone
With the introduction of iOS 13, Apple added the ability to capture full-page screenshots in Safari, which allows users to save the entire content of a web page in a single image. This feature is incredibly useful for saving online articles, receipts, or any web content for offline viewing or future reference.
How to Take a Full-Page Screenshot 아이폰 전체페이지 캡쳐
Open Safari: The full-page screenshot feature is currently limited to the Safari browser. So, start by opening the website or the content you wish to capture in Safari.
Capture the Screenshot: Press the Side Button and the Volume Up button simultaneously to capture a screenshot. For older models with a Home button, press the Home button and the Sleep/Wake button at the same time. 픽잇스마트
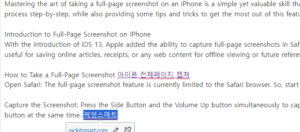
Access the Screenshot Preview: Immediately after capturing the screenshot, a thumbnail preview will appear in the bottom left corner of the screen. Tap on this thumbnail to access the screenshot editing screen.
Switch to Full Page: At the top of the screenshot editing screen, you will see two options: “Screen” and “Full Page.” Tap on “Full Page” to switch to the full-page screenshot mode.
Editing and Sharing Full-Page Screenshots
Editing: The full-page screenshot can be edited just like any other screenshot. You can crop, annotate, and add text or shapes using the tools provided at the bottom of the screen.
Saving and Sharing: Unlike regular screenshots, full-page screenshots are saved as PDF files. You can share or save your full-page screenshot by tapping the share button in the top right corner and selecting the desired option.
Tips and Tricks
Use the Sidebar for Navigation: When viewing a full-page screenshot, a sidebar appears on the right, showing a mini-map of the entire page. You can tap on any section of this sidebar to quickly navigate to different parts of the screenshot.
Bookmark Important Sections: You can use the annotation tools to highlight or underline important sections of the full-page screenshot, making it easier to find key information later.
Combine with Shortcuts: For advanced users, consider automating the process with Siri Shortcuts. You can create a shortcut that automatically opens Safari, navigates to a specific webpage, and takes a full-page screenshot.
Organize with Files App: Since full-page screenshots are saved as PDFs, they can be easily organized in the Files app. Create specific folders for different categories of screenshots to keep them organized and easily accessible.
Limitations: Be aware that the full-page screenshot feature works best with web pages. Content within some apps or dynamic web pages that require interaction might not capture correctly.
Conclusion
The ability to take full-page screenshots on an iPhone is a powerful feature that can significantly enhance your workflow and information management. By following the steps and tips outlined in this guide, you can master this feature and make the most out of your digital content. Whether it’s saving an important document, capturing a lengthy article for later reading, or simply organizing your digital life